How to create a LinkedIn account for your business – Freya Jones, Digital Ad Doctor
LinkedIn is not only a powerful tool for growing your network, but it can also help get your business in front of the right people. Here is how to set up and optimise your company page.
Mainly used by professionals, LinkedIn has over 830 million users worldwide, with 34 million users in the UK. The business-to-business (B2B) platform is great for sharing corporate and newsworthy-related content such as recent promotions, award-winning case studies, networking events, or award wins.
Whether someone is a potential client, employee, or supplier, your business’ LinkedIn page can give your supporters an insight into your company culture and upcoming projects.
Please note that in order to set up a company LinkedIn page, you must have a personal LinkedIn page already set up.
Step 1: Add your company
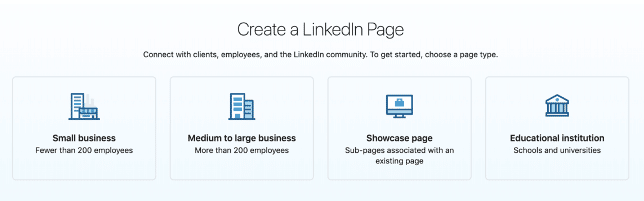
On your desktop, click the nine buttoned-like ‘Work’ icon on the top left of your LinkedIn page and select ‘Create a Company Page’ at the bottom of the option.
It will give you the option to select which type of company you are creating the page for. Select the option that best suits your business.
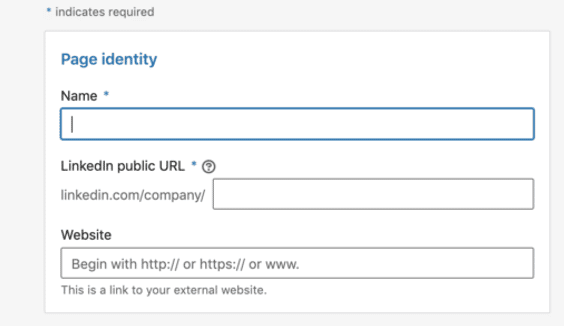
Enter your official company name and add a URL that will allow your audience to find your business easily. Add in your website URL to give your customers direct access to your company’s site.
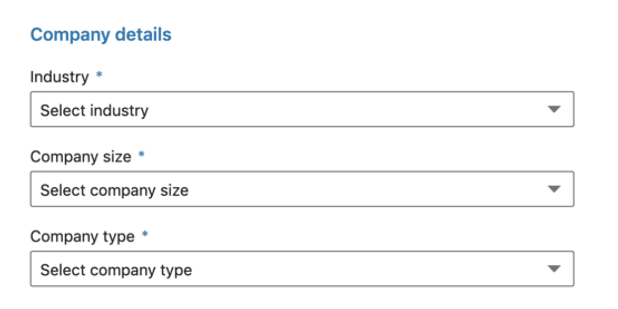
Step 2: Enter your company details
You will need to provide your company details using drop-down menus that indicate your industry, company size, and company type (public, non-profit, educational, etc.)
Step 3: Add a logo and create a company description
Choose a company logo for your LinkedIn company page. This acts as your profile picture. As LinkedIn is a professional platform, your company logo usually takes its place here. Use a square logo size of 300 x 300 pixels.
Add in a short and snappy tagline that informs readers what your business is about. This will appear at the top of your page by your company logo, so it is one of the first things people will read on the page.
Finally, check the box indicating that you have the right to act on behalf of your company, then click ‘Create Page’.
Step 4: Create a company description
Once the skeleton of your page has been made, you can pad it out a bit more by clicking on the pencil icons on the right side of the page. Here you can add a description of your company and let your potential followers know more about your brand.
You are given 2000 characters for your company description, so think about how you can best convey what you do. The first 156 characters are especially important as they appear in the Google preview of your page.
Further down the overview page, you can add up to 20 company specialities. These are tags and keywords that help people to find your business on LinkedIn. Try your best to represent your company here and include various services and strengths you have to offer as a business.
Step 5: Publish your page
Once you are happy with the description you have written and the tags you’ve chosen, as well as filling out all the other sections in editing your page, click the ‘Publish’ button and your company page will go live.
You can see what your LinkedIn business page looks like by clicking on the ‘View as member’ button at the top right of the page. If you’re not happy with how your page looks, click on ‘Manage page’ and make any changes to make it look perfect.
Don’t forget that you can always update your page if you add new services or pivot your business model.